skip to main | skip to sidebar

for the (heart) of stamping

About Me

My Photo
Erica Jones
My family is my life. We love to travel, especially anywhere that has "disney" in the title. I am an independent Stampin' Up! consultant. I love food and trying new things.
View my complete profile

Popular Posts

  • Stampin' Up's Owl Punch
    I am OBSESSED with my new owl punch.  I can't even tell you why.  It just makes me so happy inside! I have been using it non stop.  I lo...
  • Seasonal Fun: Bloghop with global stamping
    Welcome to the next stop of the Global Stamping Friends! Christmas! It's Christmas time!  Man the fall went in a blink and here we ...
  • (no title)
    Bloghop 12: kids Cards Welcome to the last stop on the global stamping friends blog hop! Because it's summer and scorching hot, ...
  • Global Stamping Friends Blog Hop #16: Festive Celebrations!
    Welcome to the next stop of the Global Stampin' Friends Blog Hop! This one is called "Festive Celebrations". This is my...
  • Global stamping friends blog hop 15
    Welcome to my stop of Global stamping friends! This is our 15th blog hop, Anything but a card. Welcome! I am in Surrey, BC, Canada, which...
  • Hippo Happiness: Favourite Bundle in 2020/2021 Annual Catalogue
    Welcome to another Global Friends Stampin' up Blog Hop! I have been absent on here for over a year. For those of you who don't know,...
  • Global friends bloghop #18
    welcome to the next stop of the global friends bloghop! This months topic is LOVE and I’m so excited to share a very simple pop up box...
  • Fabulous Folds Card!
    Apparantly, I enjoy being ambitious, because I tried this card this month that was a HUGE undertaking... but it really paid off... because i...
  • out of the box...
    I've noticed that my cards tend to be bold colors, whimsical, and young as a general rule... a big reason for this is because I work wit...
  • In Colours 2019- 2021: Global Stamping Friends Blog Hop:
    Welcome to the next stop on the global friends Blog Hop! This month's topic is the new In Colours.... I have been insanely busy th...

2010-2011

2010-2011
Here's a link to the full catalogue. Warning: products are addictively wonderful!

Pin It

Join my team as a demonstrator!

Join my team as a demonstrator!
want to earn a little extra money? Want to get a minimum 20% discount on Stampin' Up! products with lots of perks? Just click the image above and click "join me". The password is "join!"

Sites I visit

  • http://www.stampinup.com
  • http://www.splitcoaststampers.com

What I'm Reading

  • The Help by Kathryn Stockett
  • Irresistable Revolution:: Shane Claiborne

Blogs I visit

  • North Shore Stamper
    Hand Stamped Sentiments Challenge #375 ~ Colour Challenge
    3 years ago
  • srosecreative
    delta fire hall’s family day
    12 years ago
  • The Stampin' Grounds
    The Retiring Accessories List is Here!
    13 years ago

What I'm listening to

  • Aftermath Hillsong United
  • Speak Now Taylor Swift

Followers

Blog Archive

  • ►  2020 (1)
    • ►  August (1)
  • ►  2019 (1)
    • ►  July (1)
  • ►  2018 (6)
    • ►  December (1)
    • ►  September (1)
    • ►  August (1)
    • ►  July (1)
    • ►  April (1)
    • ►  February (1)
  • ►  2017 (12)
    • ►  December (1)
    • ►  November (1)
    • ►  September (1)
    • ►  August (1)
    • ►  June (1)
    • ►  May (1)
    • ►  March (2)
    • ►  February (1)
    • ►  January (3)
  • ►  2016 (9)
    • ►  December (1)
    • ►  October (2)
    • ►  September (2)
    • ►  June (2)
    • ►  March (1)
    • ►  February (1)
  • ►  2015 (12)
    • ►  December (1)
    • ►  November (1)
    • ►  October (1)
    • ►  September (1)
    • ►  June (1)
    • ►  May (1)
    • ►  April (3)
    • ►  March (2)
    • ►  January (1)
  • ►  2014 (14)
    • ►  November (2)
    • ►  October (2)
    • ►  September (3)
    • ►  June (3)
    • ►  April (2)
    • ►  February (2)
  • ►  2013 (9)
    • ►  November (2)
    • ►  October (2)
    • ►  August (1)
    • ►  July (1)
    • ►  May (2)
    • ►  February (1)
  • ►  2012 (22)
    • ►  December (2)
    • ►  November (1)
    • ►  October (2)
    • ►  September (1)
    • ►  August (3)
    • ►  July (1)
    • ►  June (1)
    • ►  May (1)
    • ►  April (3)
    • ►  March (1)
    • ►  February (2)
    • ►  January (4)
  • ▼  2011 (29)
    • ►  December (1)
    • ►  November (2)
    • ►  October (2)
    • ►  September (1)
    • ►  August (1)
    • ►  July (4)
    • ►  June (3)
    • ►  May (3)
    • ►  April (2)
    • ►  March (4)
    • ▼  February (3)
      • A word from our founder, Shelli Gardner
      • Aviary Viewmaster!
      • Splitcoast Stampers
    • ►  January (3)
  • ►  2010 (44)
    • ►  October (2)
    • ►  August (2)
    • ►  July (4)
    • ►  June (4)
    • ►  May (6)
    • ►  April (6)
    • ►  March (6)
    • ►  February (11)
    • ►  January (3)

Tuesday, February 22, 2011

A word from our founder, Shelli Gardner

Recently I had the pleasure of going to a Regional Seminar in Portland, Oregon with two of my fellow demonstrators... I really enjoyed it... especially meeting Shelly Gardner, the founder of Stampin' Up! When I was introduced to Stampin' Up! I was a casual Scrapbooker... I enjoyed putting pictures into Scrapbooks, and embellishing my memories... well, my first workshop actually blew my mind... I had no idea that there was a company out there like this! I was then pregnant with my first child, Audrey, and was so excited to make simple, cute thank you cards and birth announcements... and it has become so much more than that! What are the reasons that you love stampin' up? I'd love to hear about it.
Here is a video from Shelli that I find absolutely inspiring, I hope you enjoy!
Posted by Erica Jones at 9:37 AM 0 comments

Wednesday, February 16, 2011

Aviary Viewmaster!

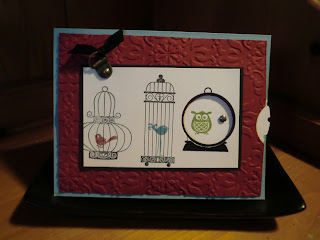
I did it! It took me almost 8 hours of work to get the layout down for this card... man was it ever hard!
So, in my post below, I showed you a new technique called "view master" that is shown on splitcoaststampers.  I worked on it for my club, but I wanted to use my new favorite set, "aviary".  Well, it turned out to be very complicated, because when you change the place for the circle, it changes everything.
Here's what the final project looks like:
I love it! And the best part is when you use the viewmaster circle on the side, the owl changes color! The color combo for the card is Basic Black, Very Vanilla, Cherry Cobbler and Baja Breeze... such a delightful combination!
I used the vintage wallpaper embossing folder for my bigshot... and the stamp set is Aviary.  I used forbidden hodgepodge, that is retired, so if you want to use something current, I suggest the mini library clips.
I used the new punch for the circle, which simplified it a LOT... it's in the new mini.
This is one of the swaps I'm going to bring for the Vancouver Regional Seminar next week, as it is an original.
Thanks for looking!
Posted by Erica Jones at 9:59 AM 0 comments

Thursday, February 3, 2011

Splitcoast Stampers

Have I ever shared with you my favorite site? When I have nothing else to do (which doesn't happen very often any more) I go to this site... it's http://www.splitcoaststampers.com/
it is the best site, ever! If you've got a stamp set that you love, you find it in the gallery, and there are endless resources, cards, and scrapbook pages made with the stamp set.  If you're anything like me, you sit and look at a stamp set, but can't come up with a perfect idea in not very much time... go to Splitcoaststampers!

AND, there's this little button on the top right, called "resources".  This is the best section! It has hundreds and hundreds of ideas for 3D projects, different folds for cards, and unique.  For instance, I want to use my new set "Aviary" for my next club card... but I wanted to use a different technique. Here's the stamp set:
Okay, I know it doesn't look like much, but I've seen the CUTEST cards using this set! I think I'm going to have to have a class in the Spring that includes this set... 
SO, I'm going to be extra creative this month, and put together the aviary stamp set, with the technique called View Master Card... remember those toys that you turn and the image changes?

Well, I'm going to try to do that with the birds in the bird cages... here's the technique, found at http://www.splitcoaststampers.com/resources/tutorials/view_master_card/.  This is the card they sample with the technique, which is nice, but not wow for me...

View-Master™ Card

by Kyla Maestas
Get yer punches out, cause you're gonna make good use of them with this project, inspired by the classic toy.

Supplies

  • Stamps
  • Ink
  • Adhesive
  • Stampin' Dimensionals
  • Coluzzle® (Circle, Mat, Cutting Blade)
  • 1/8" Hole Punch (or eyelet tools)
  • 1/16" Hole Punch (or eyelet tools)
  • 1 3/8" Circle Punch (use any variety of punches or Coluzzle as a substitute for circle punches)
  • 1 1/4" Circle Punch
  • Copy Paper
  • Neutral-colored Cardstock
  • Brad
  • 1/2 Sheet of cardstock folded and bone scored (SU! Certainly Celery© in this example)
  • Coordinating Cardstock cut to 5 3/8" x 4 1/8" (this will be adhered to your card later; SU! Bashful Blue© in this example)
  • Coordinating Cardstock cut at 5 1/4" x 4" (this will be your top piece that your View-Master will attach to; SU! Certainly Celery© in this example)

Step-by-Step

  1. Step 1

    Using the Coluzzle, cut two identical circles, one out of neutral-colored cardstock, and one out of copy paper.

    Check to see if the circle you picked will fit your card with plenty of room to turn before cutting. Set aside the neutral-colored cardstock for now.
  2. Step 2

    Fold the circle in half and then in half again. Mark these folds with a straight edge to find the center of your circle. Fold the diagonals to create 1/8 pieces (like a pizza!).
  3. Step 3

    Place the two circles together, copy paper on top. Use a piece of re-positional tape to hold the bottom circle in place if needed. The copy circle acts as a guide as you punch notches around the circle. Using the 1/8" handheld punch, punch notches on each of the ¼ lines.

  4. Step 4

    Continue adding notches at the end of the remaining fold lines.
  5. Step 5

    Discard copy paper circle. Create the last set of notches, punching in between all of the notches you have already done. Set aside.

  6. Step 6

    With coordinating cardstock (5 3/8" x 4 1/8") punch a partial hole on the right side using a 1 3/8" circle punch.
  7. Step 7

    With second coordinating cardstock (5 1/4" x 4") punch a hole in the top right corner for a window.

    Punch a partial hole using the 1 3/8 punch on the right side to allow your wheel to turn. Punch a small hole using 1/16" handheld punch for brad and wheel attachment.

  8. Step 8

    Place brad through the front of the card, turn over and attach view-master wheel.

  9. Step 9

    Stamp image inside the window. Rotate circle, repeat. If using a stamp larger than your window, create a mask to prevent stamping outside the circle.

    Place a dimensional in each of the 4 corners on the back of this piece, mount to 5 3/8" x 4 1/8" cardstock. Using dimensionals will allow your wheel to move more freely. Add to card, embellish as desired.

    .

  10. Step 10

    Finish your card.

    .


    Tune back soon to see what I've created! And feel free to post any samples you use from this technique!
Posted by Erica Jones at 11:10 AM 0 comments
Newer Posts Older Posts Home
Subscribe to: Posts (Atom)
 

avandia