skip to main | skip to sidebar

for the (heart) of stamping

About Me

My Photo
Erica Jones
My family is my life. We love to travel, especially anywhere that has "disney" in the title. I am an independent Stampin' Up! consultant. I love food and trying new things.
View my complete profile

Popular Posts

  • Stampin' Up's Owl Punch
    I am OBSESSED with my new owl punch.  I can't even tell you why.  It just makes me so happy inside! I have been using it non stop.  I lo...
  • Seasonal Fun: Bloghop with global stamping
    Welcome to the next stop of the Global Stamping Friends! Christmas! It's Christmas time!  Man the fall went in a blink and here we ...
  • (no title)
    Bloghop 12: kids Cards Welcome to the last stop on the global stamping friends blog hop! Because it's summer and scorching hot, ...
  • Global Stamping Friends Blog Hop #16: Festive Celebrations!
    Welcome to the next stop of the Global Stampin' Friends Blog Hop! This one is called "Festive Celebrations". This is my...
  • Hippo Happiness: Favourite Bundle in 2020/2021 Annual Catalogue
    Welcome to another Global Friends Stampin' up Blog Hop! I have been absent on here for over a year. For those of you who don't know,...
  • Global stamping friends blog hop 15
    Welcome to my stop of Global stamping friends! This is our 15th blog hop, Anything but a card. Welcome! I am in Surrey, BC, Canada, which...
  • Global friends bloghop #18
    welcome to the next stop of the global friends bloghop! This months topic is LOVE and I’m so excited to share a very simple pop up box...
  • Fabulous Folds Card!
    Apparantly, I enjoy being ambitious, because I tried this card this month that was a HUGE undertaking... but it really paid off... because i...
  • out of the box...
    I've noticed that my cards tend to be bold colors, whimsical, and young as a general rule... a big reason for this is because I work wit...
  • In Colours 2019- 2021: Global Stamping Friends Blog Hop:
    Welcome to the next stop on the global friends Blog Hop! This month's topic is the new In Colours.... I have been insanely busy th...

2010-2011

2010-2011
Here's a link to the full catalogue. Warning: products are addictively wonderful!

Pin It

Join my team as a demonstrator!

Join my team as a demonstrator!
want to earn a little extra money? Want to get a minimum 20% discount on Stampin' Up! products with lots of perks? Just click the image above and click "join me". The password is "join!"

Sites I visit

  • http://www.stampinup.com
  • http://www.splitcoaststampers.com

What I'm Reading

  • The Help by Kathryn Stockett
  • Irresistable Revolution:: Shane Claiborne

Blogs I visit

  • North Shore Stamper
    Hand Stamped Sentiments Challenge #375 ~ Colour Challenge
    3 years ago
  • srosecreative
    delta fire hall’s family day
    12 years ago
  • The Stampin' Grounds
    The Retiring Accessories List is Here!
    13 years ago

What I'm listening to

  • Aftermath Hillsong United
  • Speak Now Taylor Swift

Followers

Blog Archive

  • ▼  2020 (1)
    • ▼  August (1)
      • Hippo Happiness: Favourite Bundle in 2020/2021 Ann...
  • ►  2019 (1)
    • ►  July (1)
  • ►  2018 (6)
    • ►  December (1)
    • ►  September (1)
    • ►  August (1)
    • ►  July (1)
    • ►  April (1)
    • ►  February (1)
  • ►  2017 (12)
    • ►  December (1)
    • ►  November (1)
    • ►  September (1)
    • ►  August (1)
    • ►  June (1)
    • ►  May (1)
    • ►  March (2)
    • ►  February (1)
    • ►  January (3)
  • ►  2016 (9)
    • ►  December (1)
    • ►  October (2)
    • ►  September (2)
    • ►  June (2)
    • ►  March (1)
    • ►  February (1)
  • ►  2015 (12)
    • ►  December (1)
    • ►  November (1)
    • ►  October (1)
    • ►  September (1)
    • ►  June (1)
    • ►  May (1)
    • ►  April (3)
    • ►  March (2)
    • ►  January (1)
  • ►  2014 (14)
    • ►  November (2)
    • ►  October (2)
    • ►  September (3)
    • ►  June (3)
    • ►  April (2)
    • ►  February (2)
  • ►  2013 (9)
    • ►  November (2)
    • ►  October (2)
    • ►  August (1)
    • ►  July (1)
    • ►  May (2)
    • ►  February (1)
  • ►  2012 (22)
    • ►  December (2)
    • ►  November (1)
    • ►  October (2)
    • ►  September (1)
    • ►  August (3)
    • ►  July (1)
    • ►  June (1)
    • ►  May (1)
    • ►  April (3)
    • ►  March (1)
    • ►  February (2)
    • ►  January (4)
  • ►  2011 (29)
    • ►  December (1)
    • ►  November (2)
    • ►  October (2)
    • ►  September (1)
    • ►  August (1)
    • ►  July (4)
    • ►  June (3)
    • ►  May (3)
    • ►  April (2)
    • ►  March (4)
    • ►  February (3)
    • ►  January (3)
  • ►  2010 (44)
    • ►  October (2)
    • ►  August (2)
    • ►  July (4)
    • ►  June (4)
    • ►  May (6)
    • ►  April (6)
    • ►  March (6)
    • ►  February (11)
    • ►  January (3)

Wednesday, February 16, 2011

Aviary Viewmaster!

I did it! It took me almost 8 hours of work to get the layout down for this card... man was it ever hard!
So, in my post below, I showed you a new technique called "view master" that is shown on splitcoaststampers.  I worked on it for my club, but I wanted to use my new favorite set, "aviary".  Well, it turned out to be very complicated, because when you change the place for the circle, it changes everything.
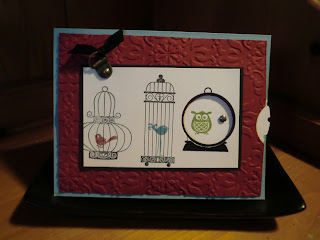
Here's what the final project looks like:
I love it! And the best part is when you use the viewmaster circle on the side, the owl changes color! The color combo for the card is Basic Black, Very Vanilla, Cherry Cobbler and Baja Breeze... such a delightful combination!
I used the vintage wallpaper embossing folder for my bigshot... and the stamp set is Aviary.  I used forbidden hodgepodge, that is retired, so if you want to use something current, I suggest the mini library clips.
I used the new punch for the circle, which simplified it a LOT... it's in the new mini.
This is one of the swaps I'm going to bring for the Vancouver Regional Seminar next week, as it is an original.
Thanks for looking!
Posted by Erica Jones at 9:59 AM 0 comments

Thursday, February 3, 2011

Splitcoast Stampers

Have I ever shared with you my favorite site? When I have nothing else to do (which doesn't happen very often any more) I go to this site... it's http://www.splitcoaststampers.com/
it is the best site, ever! If you've got a stamp set that you love, you find it in the gallery, and there are endless resources, cards, and scrapbook pages made with the stamp set.  If you're anything like me, you sit and look at a stamp set, but can't come up with a perfect idea in not very much time... go to Splitcoaststampers!

AND, there's this little button on the top right, called "resources".  This is the best section! It has hundreds and hundreds of ideas for 3D projects, different folds for cards, and unique.  For instance, I want to use my new set "Aviary" for my next club card... but I wanted to use a different technique. Here's the stamp set:
Okay, I know it doesn't look like much, but I've seen the CUTEST cards using this set! I think I'm going to have to have a class in the Spring that includes this set... 
SO, I'm going to be extra creative this month, and put together the aviary stamp set, with the technique called View Master Card... remember those toys that you turn and the image changes?

Well, I'm going to try to do that with the birds in the bird cages... here's the technique, found at http://www.splitcoaststampers.com/resources/tutorials/view_master_card/.  This is the card they sample with the technique, which is nice, but not wow for me...

View-Master™ Card

by Kyla Maestas
Get yer punches out, cause you're gonna make good use of them with this project, inspired by the classic toy.

Supplies

  • Stamps
  • Ink
  • Adhesive
  • Stampin' Dimensionals
  • Coluzzle® (Circle, Mat, Cutting Blade)
  • 1/8" Hole Punch (or eyelet tools)
  • 1/16" Hole Punch (or eyelet tools)
  • 1 3/8" Circle Punch (use any variety of punches or Coluzzle as a substitute for circle punches)
  • 1 1/4" Circle Punch
  • Copy Paper
  • Neutral-colored Cardstock
  • Brad
  • 1/2 Sheet of cardstock folded and bone scored (SU! Certainly Celery© in this example)
  • Coordinating Cardstock cut to 5 3/8" x 4 1/8" (this will be adhered to your card later; SU! Bashful Blue© in this example)
  • Coordinating Cardstock cut at 5 1/4" x 4" (this will be your top piece that your View-Master will attach to; SU! Certainly Celery© in this example)

Step-by-Step

  1. Step 1

    Using the Coluzzle, cut two identical circles, one out of neutral-colored cardstock, and one out of copy paper.

    Check to see if the circle you picked will fit your card with plenty of room to turn before cutting. Set aside the neutral-colored cardstock for now.
  2. Step 2

    Fold the circle in half and then in half again. Mark these folds with a straight edge to find the center of your circle. Fold the diagonals to create 1/8 pieces (like a pizza!).
  3. Step 3

    Place the two circles together, copy paper on top. Use a piece of re-positional tape to hold the bottom circle in place if needed. The copy circle acts as a guide as you punch notches around the circle. Using the 1/8" handheld punch, punch notches on each of the ¼ lines.

  4. Step 4

    Continue adding notches at the end of the remaining fold lines.
  5. Step 5

    Discard copy paper circle. Create the last set of notches, punching in between all of the notches you have already done. Set aside.

  6. Step 6

    With coordinating cardstock (5 3/8" x 4 1/8") punch a partial hole on the right side using a 1 3/8" circle punch.
  7. Step 7

    With second coordinating cardstock (5 1/4" x 4") punch a hole in the top right corner for a window.

    Punch a partial hole using the 1 3/8 punch on the right side to allow your wheel to turn. Punch a small hole using 1/16" handheld punch for brad and wheel attachment.

  8. Step 8

    Place brad through the front of the card, turn over and attach view-master wheel.

  9. Step 9

    Stamp image inside the window. Rotate circle, repeat. If using a stamp larger than your window, create a mask to prevent stamping outside the circle.

    Place a dimensional in each of the 4 corners on the back of this piece, mount to 5 3/8" x 4 1/8" cardstock. Using dimensionals will allow your wheel to move more freely. Add to card, embellish as desired.

    .

  10. Step 10

    Finish your card.

    .


    Tune back soon to see what I've created! And feel free to post any samples you use from this technique!
Posted by Erica Jones at 11:10 AM 0 comments

Tuesday, January 25, 2011

Club tonight

Well, tonight is my monthly club, and I decided that I couldn't decide on only one card to do, so I made two!
I made a simple, easy valentine card, that has a bit of a "wow" factor to it because of the unique fold.
Here it is:

This card fold is super simple... you just cut an 8 1/2 by 11 paper down to 4 1/4 x 11 (you can then make 2 cards with one piece of card stock).  Then you score at 2 3/4 and 5 1/2. That's it!
I used real red, pretty in pink, and basic grey.  The designer series paper is Love Impressions from the new Occasions Mini... it's super fun! The stamp set is Filled with Love, which unfortunately retired yesterday.
This is the second card I'm doing... I am obsessed with the new game spinner hands in the Mini... they are way too much fun! I did this card in a 4 x 4:

I love how it turned out! This may be a favorite color combination... I used two in colors, blushing bride and pear pizzazz, and early espresso.  The stamp set co-ordinates with the game spinner hands, it comes with 4 images:
 I bought this stamp set in clear, for only $25.95 (item #122015).  The spinner hands are 4.95 for 12 sets... (item #121893). I think this is a great deal, for a simple, wow card!
Now, if you're wondering how I got a perfect square scalloped edge, I used two punches, the scallop trim border, and the scallop edge border.  You have to use exact sizes to get a perfect edge all a way around. Here are the dimensions:

1 5/16" - 4 scallops
2 3/8" - 5 scallops
2 7/8" - 6 scallops
3 1/4 " - 7
3 13/16" - 8
4 1/4" - 9
4 3/4" - 10
5 1/4" - 11
5 3/4" - 12
Here is a picture of them, if you're a visual learner:

(thank you for the image, Gretchen Barron).

I used the  3 1/4" square for this card.
That is all for today, thanks for reading!
Posted by Erica Jones at 10:52 AM 0 comments

Friday, January 14, 2011

Sale-a-brate!

It's that happy time of year again... it's SALE-A-BRATION!
I LOVE sale-a-bration... it's the biggest promotion of the whole year!  I think it has a special place in my heart because 4 years ago (was it that long ago?!) that my friend (now also a demonstator) invited me to a workshop... and from the getgo, I was completely hooked!  I went home with a $100 order, worried my husband would be upset... however, he got this gleam in his eye, and said that I could continue to have a stamping budget monthly, as long as he could match it with a comic book budget! Yah for compromise!
Back to Sale-a-bration... starting January 25th, every $60 you spend, you earn an exclusive, limited edition stamp set! It's awesome! Contact me for a free brochure! 
Also, if you've EVER thought about becoming a demonstrator... sale-a-bration is the time to do so!  I love being a demonstrator... you get to meet new people, create your own hours and schedule, and work as little or as much as you want.  I can't believe all of the free stuff I've gotten from being a demo, either... it has blessed me so much!   When you sign up, the starter kit, that is ALREADY an incredible deal (only $215 normally... which includes $375 worth of product) is 15% off during sale-a-bration... great deal, I know... but there's more! You ALSO get an additional $60 worth of product for free! Whoo!  Did you also know that you can personally customize your standard kit?

Here's what it comes with:

starter kit • Stamp sets (5 sets: Fun & Fast Notes, I {Heart} Hearts (clear mount), For All You Do, So Many Thanks, Greenhouse Garden, OR 5 sets of your choice at the same or lower price) • Clear Block C (OR clear block at the same or lower price) • Fast Flowers Stampin’ Around® wheel (OR standard wheel of your choice) • Stampin’ Around Self Inking Handle (standard) • Uninked Cartridge (standard) • Assorted colour card stock 8-1/2" x 11" (Getting Started OR assortment of your choice) • Card stock 8-1/2" x 11" (Whisper White OR colour of your choice) • Brights Patterns Designer Series paper stack (OR colour of your choice) • Classic Stampin’ Pads® (4: Basic Black, Old Olive, Pumpkin Pie, and Real Red, OR 4 colours of your choice) • VersaMark® pad (OR ink pad at the same or lower price) • Stampin’ Write® markers (2: Daffodil Delight and Marina Mist, OR 2 colours of your choice) • Marina Mist Classic Ink Refill (OR colour of your choice) • Whisper White 5/8" satin ribbon (OR ribbon at the same or lower price) • Stampin’ Dimensionals®
• SNAIL Adhesive
(OR adhesive at the same or lower price) • Blender pen (single) • Stamping sponge (single) • Small Chocolate Songbird Tile Décor Elements (OR Décor Elements item at the same or lower price)
• Décor Elements Applicator Tool
• Stampin’ Mist®
(OR StazOn® Cleaner) business supplies
• Catalogues, business forms, and other printed materials to get your business off to a great start! You can even substitute certain stamp sets and colors to your specifications!


Contact me at yummy_starbucks@yahoo.ca to take advantage of this awesome time to sign up and join my team! As a personal gift from me, the first person to take advantage of this awesome opportunity will get a free sale-a-bration set from me as a thank you for joining my team!
Posted by Erica Jones at 3:22 PM 0 comments

Tuesday, January 4, 2011

New year

So my fall blogging was obviously terrible, I will endeavour to do a better job this winter.  It is supposed to snow today, and my sister is upstairs in the beginning stages of labour.  I feel very unmotivated to do anything related to cleaning or organizing, so I choose to blog. 
I love January, because Christmas is over (while I love Christmas, the downtime in January is heavenly), which means that there is more time to Scrap book and make cards, because there is no more entertaining, baking, or extended cleaning.  Oh, and the wrapping, and organizing...
Anyway, I'm going to do some preparing for my club this month, I'm super excited, because we have a new mini, and there are these cute spinner hands! I just got them in the mail, and I'm anxious to get my hands on them!
Here is a card, cased from Brenda Keenan, using the new stamp set that we will be doing for January club:

Plus, I won a Valentine Set "Filled with Love" and regionals in Portland in the fall, and there is a special promotion right now with the stamp set... check it out on my website: www.fortheheartofstampin.stampinup.net
here's a picture of the stamp set:

I think it's simple, yet elegant! Fun for your kids to make mini cards for class, too!
Anyway, my youngest is crying, which is my cue to stop blogging, and pay attention to my girls.   Until next time!
Posted by Erica Jones at 10:42 AM 0 comments

Wednesday, October 20, 2010

Christmas... already?

Okay, so I tend to be a little ahead of the curve on Christmas Stuff... I start decorating my house on November 1st, and drag out the boxes (I think we're up to 21 boxes now!) and start listening to Christmas Music, and bring out the Christmas CD's... so needless to say, I'm super stocked about Christmas! I love when the weather starts to get crisp (especially when it's so sunny out!) and hot apple cider... and the start of Christmas Baking.  I am THRILLED that Stampin' Up! is offering some amazing deals to get you in the mood, too! Select Christmas Supplies are 20% off, from now until December 16th... so you can start early, too!
There's nothing like an evening of Christmas prep, from making tags, (more about that later!) to homemade Christmas Gifts... who wouldn't love that?
See below for the stamp set photos and some samples of what you can make.
Here's the stuff on sale:
 Stamp Set Bundles


Bundle Description 
Wood-Mount Bundle Item  Wood-Mount Bundle
Sale Price 
Clear-Mount Bundle Item  Clear-Mount Bundle
Sale Price
 
Vintage Christmas Card Bundle
  • Bells & Boughs Set
  • Deck the Halls Designer Series Paper 
124067  $29.96  124068  $24.36 


Contempo Christmas Card Bundle
  • Contempo Christmas Set
  • Jolly Holiday Designer Series Paper 
124071  $25.96  124072  $21.96 


Tags til Christmas Bundle
  • Tags til Christmas Set
  • Decorative Label Punch 
124077  $49.52  124078  $41.52 


Gift Packaging Bundle
  • Gifted Set
  • Mini Lunch Sacks 
124083  $31.92  124084  $24.72 


Simply Adorned Gift Bundle
  • Charming Set
  • Simply Adorned 1" x 1-1/4" Charm
  • Simply Adorned 24" Chain
     
124076  $52.32  ---  --- 

Non-Stamp Set Bundle
Bundle Description 
Bundle Item  Bundle Sale Price 
Frame Gift Bundle
  • Definitely Decorative Chunky Frame
  • Small Chocolate Chip Dotted Flourish Décor Elements
124075  $23.12 


Now, here are some projects you can make with the bundles: 
The contempo bundle comes with this set:


here's a sample of a card using this set:
and the tags bundle comes with this set, as well as an AMAZING punch:


here's some samples of completed tags:
and a few more samples of other sets:
this is the mini sack kit (it comes with a stamp set, as well)
This is from a line of jewellery that you can personalize, it comes with the chain, the necklace, and a beautiful stamp set for your creativity to come alive:
And this is perhaps my favorite bundle:
The vintage christmas one comes with this stamp set:
 
and here's a sample of a simple card with this set:

Get your orders in for a chance to use these beautiful products!
Coming soon: info on my most popular class: 25 Christmas Tags for $5!
Posted by Erica Jones at 12:33 PM 0 comments

Friday, October 15, 2010

Fail!

Okay, so my youth do this thing where if someone does something wrong or bad or whatever, they say "Fail!" Which is how I feel about my blog... I have so many things I'd love to blog about, if ONLY I had the time! I got out of habit of writing twice a week, and now it's been over a month!
So here's a little bit of what's going on:
We had a Christmas-Stamp-a-Stack last weekend, and that went really well... we came together, listened to some Christmas music, and made 12 cards in 3 hours!  It was delightful... we even had apple cider... unfortunately, it was 25 degrees outside (celsius), so I ended up icing the coffee!
Here is one of the cards we made:
I wanted to go a little untraditional with the colors on this one... simple, but beautiful!
The second isn't exactly what we did, because after I took this picture, I didn't like how the sponging turned out, so I actually redid it, but it gives you the basic idea:


I LOVE this stamp! This is a border stamp, that is one giant stamp... It's in our new holiday mini, which I just LOVE. This is the cherry cobler, and the champagne glitter, which is also in the mini.  Go to my website to order any of these time sensitive product! http://www.fortheheartofstampin.stampinup.net/

I'm going away a lot in the next month... next weekend some girls and I are heading to Portland for the Stampin' Up! Regionals... this is my first official Stampin' Up! event, and I'm really excited!  Then we get back Sunday,and tuesday I leave for Whisler, where I will be attending a Pastor's Convention with my husband... then we are back for 2 weeks, and we head to Disneyland with our girls! I am so looking forward to it! Addie is now nearly 6 months, and Audrey remembers Disneyland from the last time we went (I am proud to say this will be her 5th visit in her 3 years)... it should be a wonderful time with our family.

That's all for now! More info on my Build-a-Bear Mommy and Me Class to come!
Posted by Erica Jones at 2:18 PM 0 comments
Newer Posts Older Posts Home
Subscribe to: Posts (Atom)
 

avandia